Questions? Feedback? powered by Olark live chat software
| Get: Our Articals In Your Email | Get: 120 Important Softwares all on DVD | Buy a VPN Or Proxy to get free internet | Contact Us


Ads 468x60px

Saturday, 15 February 2014

HOW TO SPY ON ANY COMPUER [ HACK LOGIN PASSWORDS ]

Did you know that one can easily look at what you are doing on your computer no mater how far he is?

Well, to day we'll discus on a very easy easy way to monitor a computers activity using a keylogger called Emis. This tool takes screenshots of the victim computer and sends the information to your Email (gmail) along with the logs

With this simple trick, You will be able to see what your victim computer is doing, What time he is doing it, All Links he goes to, What websites they visit, Some times, Even what passwords they Use, What videos they watch, Music they listen to. ETC

So. Let's Roll:

Step 1

 Download Emis Key-logger 

Step 2

Open Emis Key-logger to enter your Gmail and password [Just to be clear, don't use your personal gmail unless you don't mind ]
I recommend you open a new gmail for testing this trick. after filling the info. click on test email. You should get an email in gmail.

Options

- Block AV Sites : Blocks Virus Scanning Websites on victim's computer
-TaskManager: Disable TaskManager on victim's PC
-Regedit: Disable Regedit on victim's PC


Step 4

Click on Build.
An extra file will be created called server or the name you typed in emiss. This is the file you send to your victims and when they click on it, Their computer starts sending you reports of what they have been using the computer for. The reports are all generated to your gmail. + every report sent will included at least one screen shot of the computer.
You may as well use soft wares like Crypter to bind this server file with say any. Mp3 file so that whenever victim runs mp3 file, server is automatically installed on his computer without his knowledge.

Step 5

Upload it to Free File Storage Domains, like Mediafire, Speedyshare, Ziddu.com, etc.

That's it.
Now all you need to do is start spreading it. just make sure you make your file has an attractive name that one would be curious to open it.

Once the victim runs the keylogger file on the computer, the tool starts right away collecting and sending reports on his computer to his email

Here some images:


Inbox:


In a mail:


Simple. right?

AD -----------
Let's create professional Social Media Posts for your Business at as low as UGX 75K ($23).
Social Media Marketing has never been this simple, fast, and affordable: www.socialclark.com


Continue Reading...

Saturday, 8 February 2014

HOW TO HACK A VOLTAGE COIL ELECTRICITY METER

This is a very simple 1 considering my previous post about hacking a digital meter.


In this hack. all you need is a very powerful magnet. the more powerfully the magnet, the slower your Voltage coil rotates.

Here are the simple 3 steps:


Step 1:
Find a magnet as strong as possible
Step 2
Use a rope to tie the magnet just on top of the magnet.
Step3
Enjoy the %[percentage] of the electricity you are saving.


Note: This trick will work on only a voltage coil trick and it depends on the strength of the magnet you are using. Use an industrial magnet if you have one

[WARNING]: 

Please use this at your own risk. For i wont be responsible for your actions

YOU MIGHT WANT TO READ MY ARTICLE ABOUT: HOW TO HACK A DIGITAL METER

ENJOY !!!

AD -----------
Let's create professional Social Media Posts for your Business at as low as UGX 75K ($23).
Social Media Marketing has never been this simple, fast, and affordable: www.socialclark.com


Continue Reading...

HOW TO HACK A DIGITAL ELECTRICITY METER

AD -----------
Let's create professional Social Media Posts for your Business at as low as UGX 75K ($23).
Social Media Marketing has never been this simple, fast, and affordable: www.socialclark.com
------------------------

[WARNING]: This tutorial might be illegal in some Countries if not all]

“This article is only for educational purposes and I won’t be responsible for your illegal electricity connection ”

Let’s get started. In this article I will be reviewing and showing you the possible ways to hack electricity then I will also review UMEME’s new method to prevent electricity hacking.


For security purposes, I won’t be giving detailed information and please don’t call me so I can hack electricity for you.

Hacking the digital meter surely proved an easy task as UMEME realized it was loosing a lot with them and that’s why they are deploying the YAKA meter (which am going to be reviewing in the coming week by the way). I will talk about Yaka at the end so for now let’s stick to hacking a digital meter.

Hacking a digital meter is just common electricity knowledge.

[What we need]

First what you need to have basic knowledge of what electricity is. All you need is a strong copper wire about 12 Inches depending on the distance between your digital meter and the Fuse inside your meter box.

[How it works]

See that wire most probably black from the electric Pole to your house? All it does is brings in electricity, The electricity is put into the meter box and fixed into that plastic object where a fuse is placed. Your digital meter then connects to the other end of that plastic object with 2 wires most probably Red and Black. These wires are called “Red=Live, black= Neutral] and another wire Green= Earth is directed in the ground” however your colors might defer. Ok now all a fuse does is combine the black wire to the meter when placed between the black wire and the digital meter on that Plastic object in the meter box. All we need to do is bypass this circuit by removing the fuse and replacing it with our own circuit using a strong wire.

Steps:

1. Remove at list 2 inches of rubber off each side of your copper wire.

2. Bend the coper wire so it can move from the fuse to the digital meter.

3. Remove the fuse from the meter box [This will disconnect your electricity]

4. Now you should see the red wire connected to the Plastic object. What you need is to carefully insert one end of the strong wire into the downer section/hole of the plastic object and the other end to a wire mostly red that enters your meter from your house.

In this trick, you are connecting the red live wire which has electricity direct to the live wire taking electricity in your house without passing through the digital meter that filters and counts your electricity Usage.
Now you can enjoy free unlimited electricity.
You might want to check out how to hack a voltage coil electricity meter too

NOTE: Remember this tutorial is only for educational purposes. And, [I won’t be responsible for your actions].

ENJOY !!

DISCLAIMER: This article is only for educational purposes and so I won't be held responsible for your actions.


AD -----------
Let's create professional Social Media Posts for your Business at as low as UGX 75K ($23).
Social Media Marketing has never been this simple, fast, and affordable: www.socialclark.com


Continue Reading...

Friday, 7 February 2014

HOW TO UPGRADE YOUR COMPUTER’S [ BIOS ] SETTINGS

AD -----------
Let's create professional Social Media Posts for your Business at as low as UGX 75K ($23).
Social Media Marketing has never been this simple, fast, and affordable: www.socialclark.com
------------------------

 First things first. What is BIOS?

(BIOS) also known as Basic Input-Output System is an embedded operating system on computer motherboards. It is the first operating system that loads on your computer before other reparation systems like windows, Linux among others load. This is so it can load start up settings like drivers for devices like a CD drive, Keyboard, mouse among other.


In This guide, I will show you how to Upgrade your BIOS for any computer/Motherboard. However I should say- not all computers have the same mother board nor the same manufacturer.

Not to wast any time, First: you want is know who your mother board manufacture is. To do this just right click on your computer and select “properties”. With this you should see your computer’s basic Information.

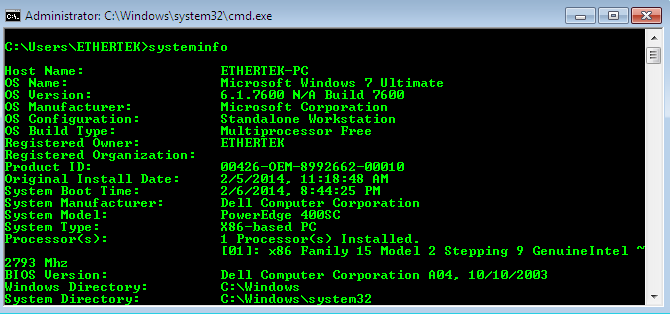
Or you can just go into Command prompt and enter a command: systeminfo


If you can open your computer up. Just open the casing and you should see the manufacture and the version.
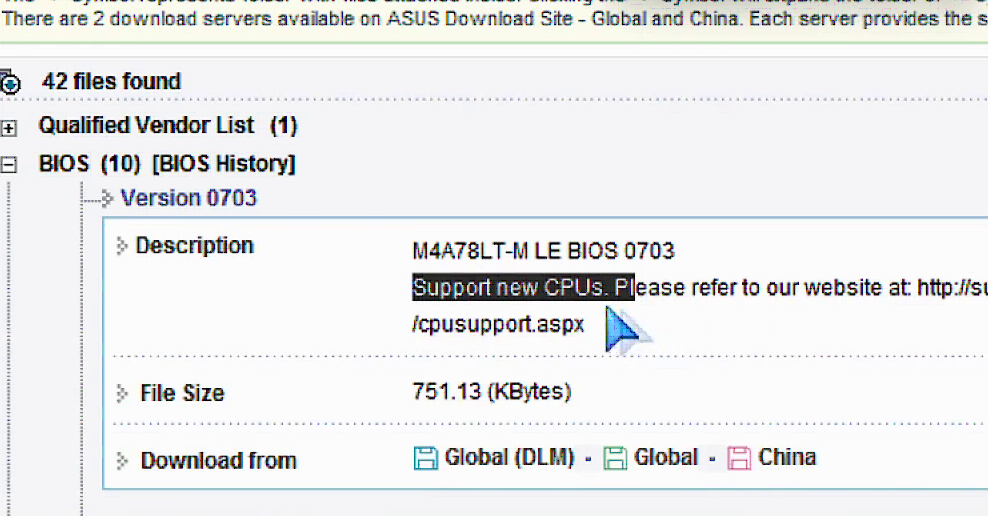
Second you want to go to your manufacture’s website, find a tab like Drivers or Downloads and click it.


With this you should be able to play around the website to find where you can download their new motherboard upgrade.

Now there are two ways you can use this download. One way is buy using a floppy disk if you have pne. The other is using a disk.

In this tutorial I will show you both ways…

Using a Floppy disk [ This is the easy old method ]:

This is the same method that was used in the early computers and can still be used even now. it is efactive and very easy to use. how ever will require you to have aFloppy disk and a flopy driver on your computer. Here we go

Step 1

Just insert and format your floppy disk,

step 2

Copy the update you downloaded to the floppy disk and shutdown your computer.

Switch your computer back on and boot it with the floppy disk.

Step 3:

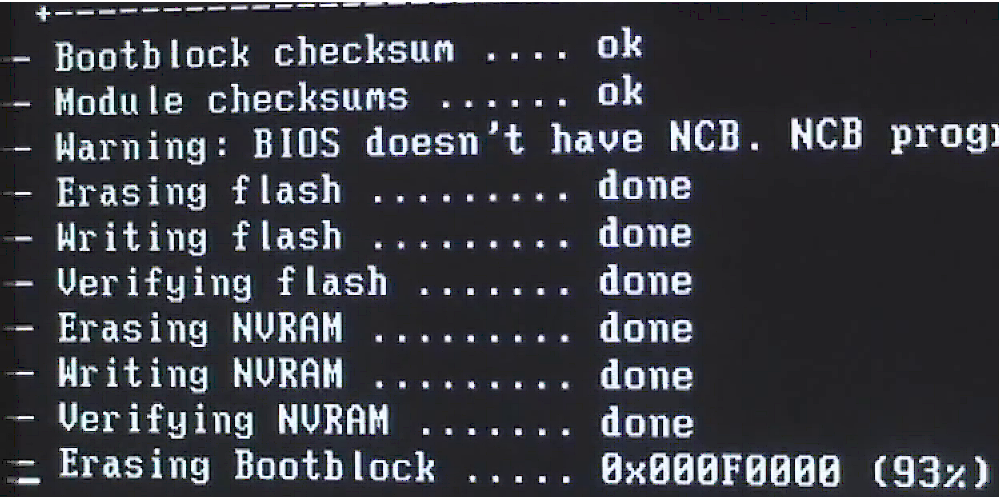
Lastly: Run the bat file or command to update the Bios.
It might not display just like this but will surely be slimier to this:


After it completes computer will restart and you should see a different interface in bios.
And you are done

Using a Disk Drive or USB:

This method involves using the system inbuilt bios updater. However I should say, some computers especially if you have a Pentium 3 or earlier,this option might not be available.

Step 1

Copy what you downloaded to an easy to remember location on your hard drive.

Step 2

Shut down your computer and switch it on again.and press “delete” in some computers you may need to press F2 to go to BIOS settings.

Step 3

Look for the BIOS Update/upgrade Utility and enter into it.

Step 4

Now browse to the location where you put the files you downloaded and press “enter”.

Here your system will detect the update version and will then update your Bios with new settings and information

There you are done.

Note: Updating should take a few seconds perhaps a minute

Warning:

  •  Avoid updating the BIOS unless you know what you are doing [Please find a technician who can do it If you didn't understand any of the steps.
  • power fluctuation during a flash may irrevocably corrupt the firmware [Make sure the electrical power source is reliable]
  • Make sure to obtain the BIOS upgrade software from a reliable source [I highly advise you to download updates only from the manufacturer's website ]
Alright, that’s it for today enjoy !!!


AD -----------
Let's create professional Social Media Posts for your Business at as low as UGX 75K ($23).
Social Media Marketing has never been this simple, fast, and affordable: www.socialclark.com


Continue Reading...

Thursday, 6 February 2014

HOW TO KEEP YOUR COMPUTER WORKING WHILE YOU SLEEP

Ok. Lets forget about energy savings a powerful PC is meant to be utilized! And this is the reason as to why I will pass you through ways on how you can utilize your PC whether you are sleeping or at work.


The great part about your computer is that [unlike you] it doesn't require any sleep. Take advantage of your PC by automating time and processor-intensive tasks while you're sleeping. Below I will talk about the tasks you can give to your Computer so you can fully Utilize it. Start these processes before you clock out for the evening or as you start off to work. To make sure they run as quickly as possible, set your computer's power management for high performance and turn off other tasks that might interfere, such as Windows and application updates and other processes.

Backup & Update


A lot of us have emphasized the importance of backup time and again even though it is the stuff that boring work is made of. Rather than incorporate it into your regular computing hours and staring at your computer while your maintenance tasks completes. Make computer maintenance an overnight task that your computer performs without you

Downloads

Talking about Downloading, A lot of you will think of Internet download manager well, downloading using tools like Utorrent is ranked highly by all down loaders –Even me-, and for obvious reasons, Downloads can take a long time and those hours you're sleeping are the sweet-able ones to completing downloads especially 10 + GBs. But rather than keep your PC on all night long, Most file download applications like bit and utorrent & IDM- have built-in options for shutting down, when your downloads completes.

Video encoding


Many of us will never know the time it takes to do some seriously heavy video encoding, but if you've ever tried ripping a DVD, you know how much time and CPU cycles video encoding can take. Outsource you’re ripping and other encoding jobs overnight so you can save your time than sitting and staring at your computer while it encodes.

Render Graphics

Rendering graphics is among the most time-consuming tasks you can perform, so you shouldn't waste precious playtime by watching your computer rendering video bits.

Compiling code


Compiling code from source can be an intensive process, and it is better off users use their overnight cycles to update and compile software on both Mac and windows–even Linux-.

Hard drive repair


You can't do much to save a hard drive from dying and you can do your part to keep your disks healthy specifically by regularly fragmenting and checking for and repairing any disk errors. Try to schedule this maintenance once or twice per week, while you're sleeping, so you can rest easy that you've done all you can to keep your disks running in tip-top shape

Virus and malware scanning


Although most current anti-virus and anti-malware programs can run while you use your computer for other tasks, you're still better off to check your machine for problems when you're not using it. Depending upon your favorite antivirus software, you might be able to schedule scans from within the software, or in some cases, you might need to run Windows Task Schedule.


With all that in mind, I hop you will now use your time more effectively. However I got to say: turning off your computer for half of the day [3–6 hours] is really healthy for your computer and I advise it for those that want to use this guide for 24/7 and yes you may find your power bills go through the roof.


AD -----------
Let's create professional Social Media Posts for your Business at as low as UGX 75K ($23).
Social Media Marketing has never been this simple, fast, and affordable: www.socialclark.com


Continue Reading...

Tuesday, 4 February 2014

All Samsung Unlock Codes 2014

Ok. After sharing my unlock codes for Nokia, People liked it but then I realize that there are now lots of Samsung phones too. So today I am giving you a list of Samsung phone unlock codes. Use this list to unlock almost any kind of lock/ Settings in your Samsung phone for example: Reset default settings, WAP settings etc.  


If you don't mind, You might want to check out:
My top 14 Nokia master codes


Not to waste your time. Here is the list:

 *2767*688# = Unlocking Code
*#8999*8378# = All in one Code
*#4777*8665# = GPSR Tool
*#8999*523# = LCD Brightness
*#8999*3825523# = External Display
*#8999*377# = Errors
#*5737425# = JAVA Something{I choose 2 and it chrashed}][/b]
*#2255# = Call List
#*536961# = Java Status Code
#*536962# = Java Status Code
#*536963# = Java Status Code
#*53696# = Java Status Code
#*1200# = AFC DAC Val
#*1300# = IMEI
#*1400# = IMSI
#*2562# = ??? White for 15 secs than restarts.
#*2565# = ChAeck Blocking
#*3353# = Check Code
#*3837# = ??? White for 15 secs than restarts.
#*3849# = ??? White for 15 secs than restarts.
#*3851# = ??? White for 15 secs than restarts.
#*3876# = ??? White for 15 secs than restarts.
#*7222# = Operation Typ (Class C GSM)
#*7224# = I Got !! ERROR !!
#*7252# = Oparation Typ (Class B GPRS)
#*7271# = Multi Slot (Class 1 GPRS)
#*7274# = Multi Slot (Class 4 GPRS)
#*7276# = Dunno
#*7337# = EEPROM Reset (Unlock and Resets Wap Settings)
#*2787# = CRTP ON/OFF
#*3737# = L1 Dbg data
#*5133# = L1 Dbg data
#*7288# = GPRS Attached
#*7287# = GPRS Detached
#*7666# = SrCell Data
#*7693# = Sleep Act/DeAct (Enable or Disable the Black screen after doing nothing for a while)
#*7284# = Class : B,C or GPRS
#*2256# = Calibration Info
#*2286# = Battery Data
#*2527# = GPRS Switching (set to: class 4, class 8, class 9 or class 10)
#*2679# = Copycat feature (Activate or Deactivate)
#*3940# = External loop test 9600 bps
#*4263# = Handsfree mode (Activate or Deactivate)
#*4700# = Half Rate (Activate or Deactivate)
#*7352# = BVMC Reg value
#*8462# = Sleeptime
#*2558# = Time ON
#*3370# = EFR (Activate or Deactivate)
#*3941# = External looptest 115200 bps
#*5176# = L1 Sleep
#*7462# = SIM phase
#*7983# = Voltage/Frequenci (Activate or Deactivate)
#*7986# = Voltage (Activate or Deactivate)
#*8466# = Old time
#*2255# = Call ???
#*5187# = L1C2G trace (Activate or Deactivate)
#*5376# = ??? White for 15 secs than restarts.
#*6837# = Official Software Version
#*7524# = KCGPRS
#*7562# = LOCI GPRS
#*7638# = RLC allways open ended TBF (Activate or Deactivate)
#*7632# = Sleep mode Debug
#*7673# = Sleep mode RESET
#*2337# = Permanent Registration Beep
#*2474# = ???
#*2834# = Audio Path
#*3270# = DCS support (Activate or Deactivate)
#*3282# = Data (Activate or Deactivate)
#*3476# = EGSM (Activate or Deactivate)
#*3676# = Flash volume formated
#*4760# = GSM (Activate or Deactivate)
#*4864# = Dunno doesn’t work on newer versions
#*5171# = L1P1
#*5172# = L1P2
#*5173# = L1P3
#*7326# = Accessory (I got Vibrator)
#*7683# = Sleep variable (8)
#*7762# = SMS Brearer CS (Activate or Deactivate)
#*8465# = Time in L1
#*9795# = wtls key
#*2252# = Current CAL
#*2836# = AVDDSS Management (Activate or Deactivate)
#*3877# = Dump of SPY trace
#*7728# = RSAV done# (Everything went to standart but nothing was deleted)
#*2677# = ARM State (None or Full Rate)
*#8999*636# = Have no clue what it is, i see 20 lines
*#9999# = Software version
*#8999*8376263# = HW ver, SW ver and Build Date
*#8888# = HW version
*#8377466# = Same HW/SW version thing
*#7465625# = Check the locks
*7465625*638*Code# = Enables Network lock
#7465625*638*Code# = Disables Network lock
*7465625*782*Code# = Enables Subset lock
#7465625*782*Code# = Disables Subset lock
*7465625*77*Code# = Enables SP lock
#7465625*77*Code# = Disables SP lock
*7465625*27*Code# = Enables CP lock
#7465625*27*Code# = Disables CP lock
*7465625*746*Code# = Enables SIM lock
#7465625*746*Code# = Disables SIM lock
*7465625*228# = Activa lock ON
#7465625*228# = Activa lock OFF
*7465625*28638# = Auto Network lock ON
#7465625*28638# = Auto Network lock OFF
*7465625*28782# = Auto subset lock ON
#7465625*28782# = Auto subset lock OFF
*7465625*2877# = Auto SP lock ON
#7465625*2877# = Auto SP lock OFF
*7465625*2827# = Auto CP lock ON
#7465625*2827# = Auto CP lock OFF
*7465625*28746# = Auto SIM lock ON
#7465625*28746# = Auto SIM lock OFF
*2767*3855# = E2P Full Reset
*2767*2878# = E2P Custom Reset
*2767*927# = E2P Wap Reset
*2767*226372# = E2P Camera Reset
#*6420# = MIC Off
#*6421# = MIC On
#*6422# = MIC Data
#*6428# = MIC Measurement
#*3230# = Trace enable and DCD disable
#*3231# = Trace disable and DCD enable
#*3232# = Current Mode
#7263867# = RAM Dump (On or Off)
*2767*49927# = Germany WAP Settings
*2767*44927# = UK WAP Settings
*2767*31927# = Netherlands WAP Settings
*2767*420927# = Czech WAP Settings
*2767*43927# = Austria WAP Settings
*2767*39927# = Italy WAP Settings
*2767*33927# = France WAP Settings
*2767*351927# = Portugal WAP Settings
*2767*34927# = Spain WAP Settings
*2767*46927# = Sweden WAP Settings
*2767*380927# = Ukraine WAP Settings
*2767*7927# = Russia WAP Settings
*2767*30927# = GREECE WAP Settings
*2767*73738927# = WAP Settings Reset
*2767*49667# = Germany MMS Settings
*2767*44667# = UK MMS Settings
*2767*31667# = Netherlands MMS Settings
*2767*420667# = Czech MMS Settings
*2767*43667# = Austria MMS Settings
*2767*39667# = Italy MMS Settings
*2767*33667# = France MMS Settings
*2767*351667# = Portugal MMS Settings
*2767*34667# = Spain MMS Settings
*2767*46667# = Sweden MMS Settings
*2767*380667# = Ukraine MMS Settings
*2767*7667#. = Russia MMS Settings
*2767*30667# = GREECE MMS Settings
*335# = Delete all MMS Messages
*663867# = Dump Mm file
#*536961# = WAPSAR enable / HTTP disable
#*536962# = WAPSAR disable / HTTP enable
#*536963# = Serial eable / Others disable
#*53696# = Java Download Mode
#*5663351# = Wap Model ID [Your Model]
#*5663352# = Wap Model ID [SEC-SGHXXXX/1.0]
#*566335# = Wap Model ID [SEC-SGHXXXX/1.0]
*2767*66335# = Check on which model it is
*2767*7100# = SEC-SGHS100/1.0
*2767*8200# = SEC-SGHV200/1.0
*2767*7300# = SEC-SGHS300/1.0
*2767*7650# = Nokia7650/1.0
*2767*2877368# = Reset WAP Model ID to standard.

Ok now you might use this at the moment but. It’s worth keeping for a rainy day.


Enjoy!
Continue Reading...
Get Our Latest Articles Delivered to Your email

You will shortly receive a confirmation email. Please approve to complete Subscribtion.


Alittle About Me

I am an open minded person with a great interest in computer networks, programming and cyber security. My love for computers started way back since elementary school where I din't have access to the internet nor did I have a computer at my disposal. In the long run at the right time, the love I had for so long was taken to the next level when I was granted internet access and mostly, A computer at my disposal. This allowed me to develop and enhance my skills more effectively. Currently on a cyber... Continue Reading

To all those that visit. We highly appreciate.
Thank You!

Do you like what you see?

Get our Daily email updates (It's Free):